(Adding categories) |
m (Tunnel still works with a two block gap. Checked on the most recent beta windows version.) Tag: Visual edit |
||
| Line 34: | Line 34: | ||
=== Tunnel === |
=== Tunnel === |
||
[[File:Screenshot 32.png|thumb|238x238px|Two Tunnels transporting various items under a Pulse Conduit.]] |
[[File:Screenshot 32.png|thumb|238x238px|Two Tunnels transporting various items under a Pulse Conduit.]] |
||
| − | The '''tunnel''' is a fairly new block in the game, and has caused quite a bit of misunderstanding on its use. Using a tunnel is simple. Place one with its arrow pointing to the source, and another on the other side of a block with the arrow pointing to the output, as shown in the picture. Tunnels can only transport items under ''' |
+ | The '''tunnel''' is a fairly new block in the game, and has caused quite a bit of misunderstanding on its use. Using a tunnel is simple. Place one with its arrow pointing to the source, and another on the other side of a block with the arrow pointing to the output, as shown in the picture. Tunnels can only transport items under two''' blocks'''. It will not work otherwise. |
=== Junction === |
=== Junction === |
||
Revision as of 05:34, 15 January 2018
More accurately, they are called distribution blocks. They are several useful blocks that allow the player to transport items and liquids.
Conveyors
Conveyors are the main tool for moving items around. There are three types of conveyors currently, from worst to best: (stone/basic) conveyor, steel conveyor, and pulse conveyor. Each are made of their respective materials and go at different degrees of speed.
The starting conveyor (Named simply conveyor) is made of 1 stone, which is the beginning resource. The exact movement rate is: 1.2 units per second. Due to it being the slowest, its usefulness is very limited. However, basic conveyors can be useful even in the late game for small lanes, about 1-5 tiles long.
Next is the steel conveyor. The price of this conveyor is 1 steel and moves things twice as fast as its predecessor, for a speed of: 2.4 units per second.
Finally is the pulse conveyor. Made of 1 dirium per tile, this speedy conveyor sports a speed of: 5.4 units per second. By far the fastest and the most expensive, the pulse conveyor can easily carry massive amounts of items from one place to another with great speed.
Conduits
Conduits do the same thing as conveyors, but with liquids instead. There are currently only the conduit and the pulse conduit. The basic tactics of how to use/place them are the same as the conveyor.
The basic conduit is made of 1 steel and has a liquid capacity of 10
The pulse conduit is made up instead of 1 steel and 1 titanium. It holds a liquid capacity of 16.
'Special' distribution blocks
There are various blocks you can use that further assist with transporting things around. Routers, teleporters, sorters, tunnels, and junctions all allow the player to further expand and improve their system, and make things significantly easier.
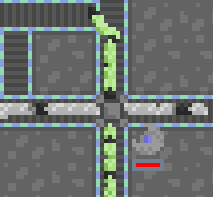
Router
The router, splitting an input of Iron onto 3 conveyors.
The router (one for liquid, one for items) is used to divert supplies that come from one line into 3 different directions. This block accepts items from one direction and outputs them to available exits in an orderly fashion, such a turret or even another router. It is also possible to have 2 lanes go into the router and two lanes go out. If there is only one exit, then it will simply act as a basic conveyor. The item router also has a capacity of 20, useful in the even of overflow or for storing (and distributing) extra ammo for turrets. The liquid router works the same, splitting one input liquid source into 3.
Teleporter
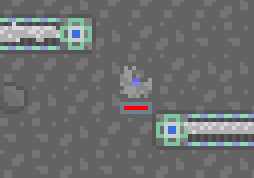
Blue-colored Teleporters teleporting various items.
The teleporter is a very useful block that instantly transfers an item to its corresponding pair. It can take in and output items from all four of its directions. To pair two teleporters, pick a color by tapping/clicking what you choose to be your input teleporter, choosing the color (currently only 7) using the two arrows, and doing the same for your exit teleporter. You can have as many input and output teleporters paired with each other.
Sorter
The sorter sorting Iron from Stone.
The sorter is a block that takes in items from one of its sides, and separates items from an item you choose. You can choose which item to sort out by tapping/clicking on it, and choosing a color that corresponds to the color of the item you want to sort out using the two arrows. It takes in items from one of its sides, outputs the chosen item on the opposite of its input side, and outputs the rest of the items to a side left or right of the input side.
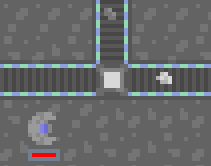
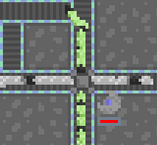
Tunnel

Two Tunnels transporting various items under a Pulse Conduit.
The tunnel is a fairly new block in the game, and has caused quite a bit of misunderstanding on its use. Using a tunnel is simple. Place one with its arrow pointing to the source, and another on the other side of a block with the arrow pointing to the output, as shown in the picture. Tunnels can only transport items under two blocks. It will not work otherwise.
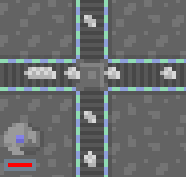
Junction
A junction doing its job.
Finally, the junction (also for liquids) is a block that takes items/liquids from its two inputs, and outputs them to their opposite sides. That's it. It makes things way easier as you can move items through conveyors without them moving onto that conveyor. It works the same way for liquids.